Event Manager Release Archive
Below is a list of archived enhancements and bug fixes deployed to Event Manager.
2024 Release Notes
Enhanced Scope of Notifications for Task Assignees
The system is enhanced to notify the assignee on a task when the status is changed to Completed, Deleted, or Denied. A email notification is sent to the assignee. The status of a task can change due to event updates, individual task updates, or use of the bulk update functionality.
Benefit: This enables the assignee to remain updated so that they can plan accordingly and saves their time.
Bulk Update Functionality for Missing Location Coordinates
This feature enables the admin user to update (in bulk) latitude and longitude values on the locations where they are missing. The system uses the complete address on a location (Address 1, City, State, and Zip code) to calculate the location coordinates and populates them automatically.
NOTE This feature is available at both site and global level.
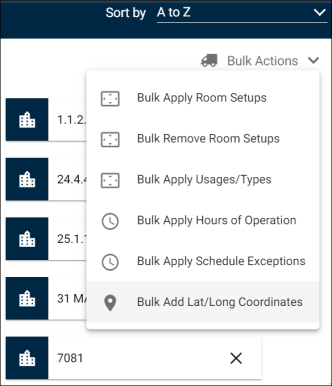
On the Locations page, the Bulk Add Lat/Long Coordinates option is added to the Bulk Actions dropdown list.
Benefit: This functionality saves time as users do not need to manually update locations that have missing coordinates. The mapping feature on the Community Portal relies on location coordinates for displaying the map. Therefore, it is expected that a greater number of users will benefit from this feature.
Updating the Latitude and Longitude Values on Locations in Bulk
Navigation: Dashboard > Settings > Locations/Global Locations
To update the missing latitude and longitude values in bulk:
-
From the Dashboard, click Settings.
-
On the Site Administration tile, click Locations.
-
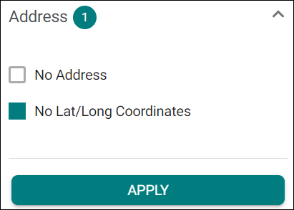
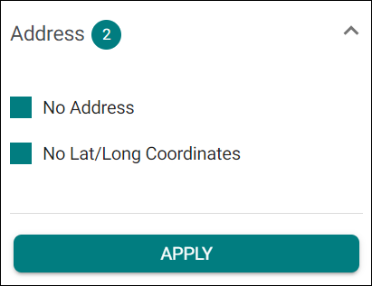
On the Filters pane, click the Address filter and select the No Lat/Long Coordinates option.
-
Click Apply. The locations matching the selected criteria are displayed.
-
Click the Select All check box.
-
On the Bulk Actions dropdown list, click the Bulk Add Lat/Long Coordinates option.
-
Click Apply. The latitude and longitude values are successfully updated.
-
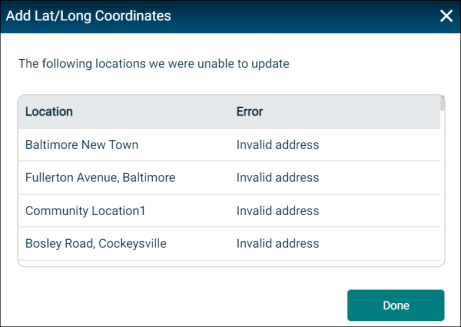
On the Add Lat/Long Coordinates popup, the locations where coordinates were not populated due to missing or incomplete address are displayed.
Enhanced Limit for Custom Site Questions
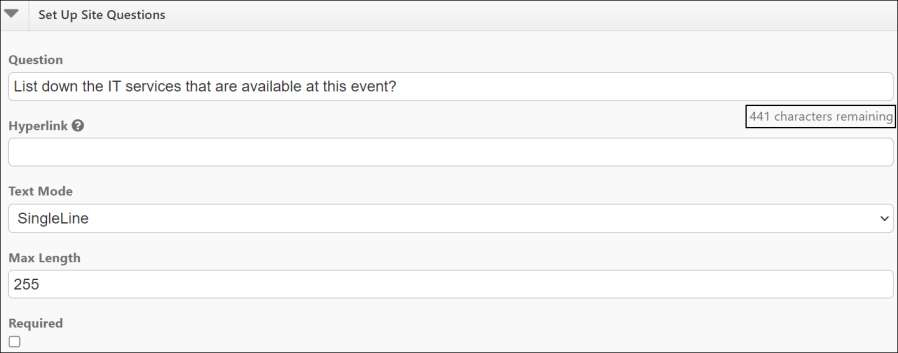
The character limit for custom site questions is increased from 255 to 500. You can create specific questions that are lengthy and also provide background and supporting information for greater clarity.
On the Site Event Form Questions page, a reverse counter is provided under the Question field. It counts backwards as you type and shows the remaining characters that you can enter in real time.
Added a New Filter for Events
Navigation: Dashboard > Events > Events List / Pending Events
On the Filters panel, a new filter Organization Type is introduced. This filter is made available on the Events List and Pending Events pages respectively. Clicking the arrow next to Organization Type displays the available filter options. This functionality works the same way as you have used it in the past.
To view events for specific organization types, select their respective check boxes and click Apply. The system displays events matching the search criteria.

NOTE To search for a filter option, enter a keyword in the Search Organization Type text box and hit enter.
Detailed Cost Breakdown for Events
Navigation: Settings > Create an Event > Location & Time
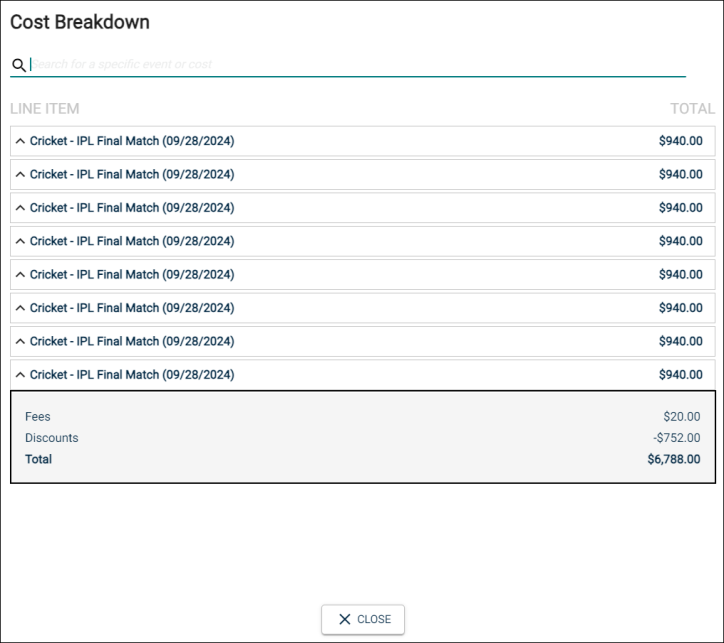
The Estimated Cost subsection is enhanced to provide a breakdown of the total cost. In addition to the line items, fees and discounts are also displayed so that there is greater transparency.
When you click the See Cost button, the Cost Breakdown popup provides a detailed breakdown of cost for the event including Line Items, Fees, and Discounts along with the total.
NOTE If there are multiple packages linked to a location, you can click the down arrow next to each package to expand the line items.
Revamped Community Portal and New Map Feature
The landing page of the Community Portal is revamped with a fresh look and feel. The new design is expected to enable users to quickly find the location(s) that meet their requirements so that they can proceed with the booking.
A map is added to display the location along with a location pin. On the Community Setup page, the Show Map toggle is added to control this functionality. It can be turned on or off.
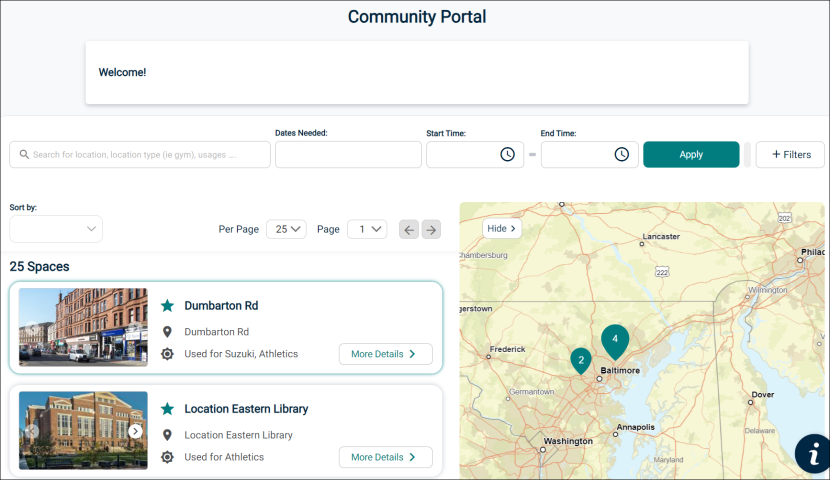
Under this enhancement, the following changes are made:
-
The search box is moved to the top of the page near the search results.
-
The filters are available in the same row on the right side of the page.
-
The featured locations are displayed at the top of the search result with a star icon, indicating that they are featured.
-
An option to provide a picture for the location (thumbnail and/or banner) is introduced. When you are creating or editing a location, you can add a picture by clicking the Pictures tab.
-
The right side of the screen has a map that shows the location with a pin.
-
On the Locations page (Create/Edit), under the Description & Address tab, the field for entering the Phone number is repositioned on the page.
Important Points
-
The map displays locations which have a complete address and/or latitude and longitude values.
-
The building placeholder image is displayed for a location when no picture is uploaded.
-
If there is a location pin with a number, click to zoom the map and view the locations under the location pin.
-
The quick view provides additional details about the location so that you can complete the booking process. To view quick details, click More Details on the location or a location pin which does not have a number.
Enhanced Location Functionality and New Address Filter
Navigation: Settings > Locations/Global Locations > Filters
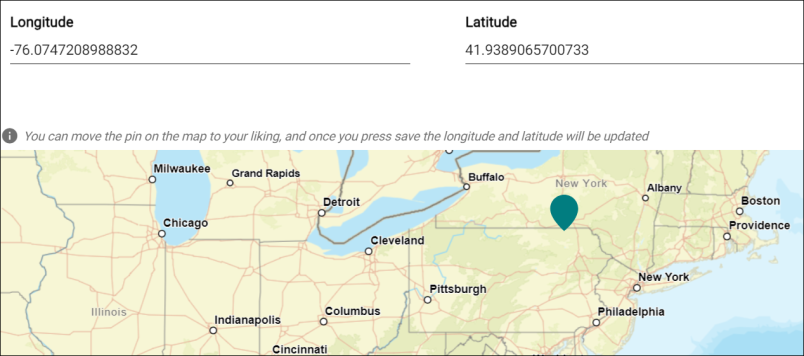
The filtering functionality is enhanced to easily identify locations with missing data. The admin user can adjust the location coordinates by clicking on a map. This enhancement is applicable for locations created/edited using the Site Administration and Global Administration tiles respectively.
Benefit: This is expected to increase the usefulness of the mapping feature introduced on the Community Portal.
Under this enhancement, the following changes are made:
-
On the Settings > (Locations/Global Locations) page, the Address type filter is introduced. This filter has two options, No Address and No Lat/Long Coordinates.
-
Selecting the No Address filter displays all locations where a complete address is not provided (Address line 1, City, State, and Zip code).
-
Selecting the No Lat/Long Coordinates filter displays all locations where latitude and longitude values are not provided.
-
-
On the Create a New Location and Edit Location pages, under the Description & Address tab, a map is added before the Additional Details section.
-
The location is highlighted on the map with the help of a location pin.
-
The location is displayed on the map only when the latitude and longitude values are updated.
-
If the complete address is updated, the location coordinates are automatically populated and the location is displayed on the map.
-
When the admin user clicks on the map, the location coordinates are updated but the address remains unchanged.
-
User Interface Enhancement for Scheduling Exceptions
Navigation: Settings > Global Locations > Edit > Restrictions
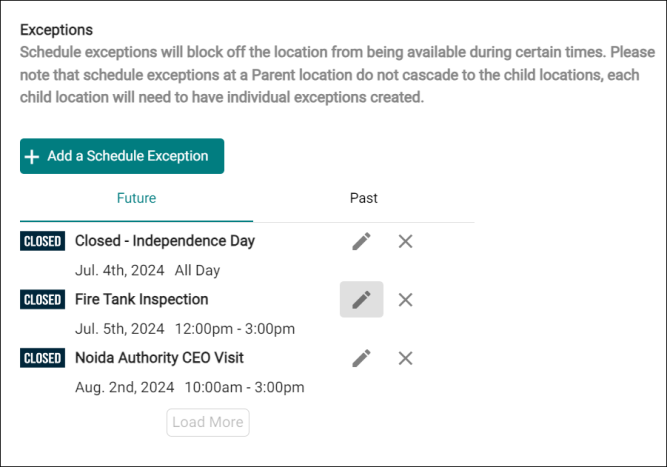
The Schedule a Closing popup is enhanced by adding the Description text box. The admin user can provide a reason for closing the facility in this box. The exceptions displayed on the page are adjusted to make them user friendly. The dates are displayed in ascending/descending order so that the user does not have to scroll to the bottom of the page.
Under this enhancement, the following changes are made:

-
On the Schedule a Closing popup window:
-
Added the Description text box. The admin user can optionally provide a reason for closing the facility. The text box accepts a maximum of 60 characters.
-
Select All: Added the Select All check box. Click to apply the exception to all the locations.
-
Search locations: Added the Search locations text box to quickly search the name of a location.
-
The UI display for selecting the date and time range is enhanced.
-
-
Future and Past tabs: The exceptions are categorized under two tabs. The Future tab shows exceptions where the date and time has not elapsed and the Past tab shows expired exceptions. By default, the Future tab is displayed.
-
On the Future tab the exception dates are sorted in ascending order, whereas on the Past tab they are sorted in descending order.
-
The Add a Schedule Exception button is moved near the top of the section.
-
The vertical scroll bar is replaced by the Load More button. When the user clicks this, the page expands and all the exceptions are displayed.
Adding Location Hierarchy to Featured Locations
Navigation: Settings > Community Setup> Add Locations
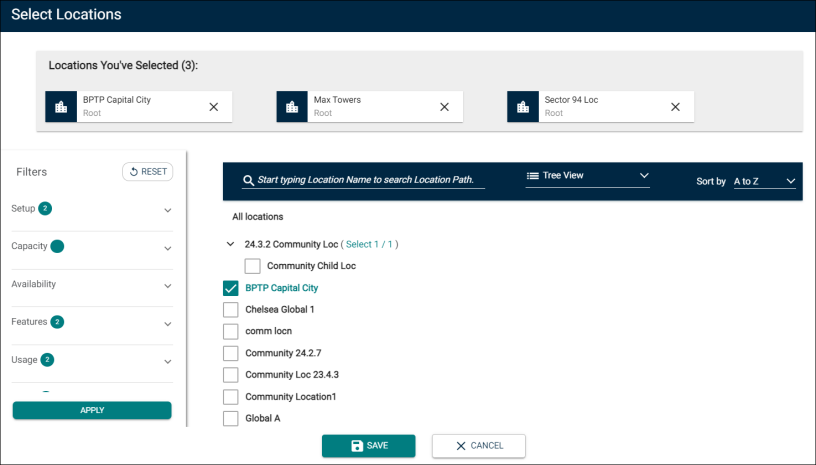
The Select Locations popup window is enhanced so that it is user friendly and it is easy to select the location(s) that should be added as a featured location. The entire hierarchy of locations is displayed on the popup.
Multiple filter options are added so that only locations matching the selected criteria are displayed. This makes it easy to drill down and take an informed decision regarding the location(s) that should be featured on the community portal. The admin user can view the locations using Tree View or Location Explorer. An option to search a location using a keyword is also provided.
Refer to the following screenshot.
New Column Added to the Media Library
Navigation: Settings > Calendar Settings > Media Library
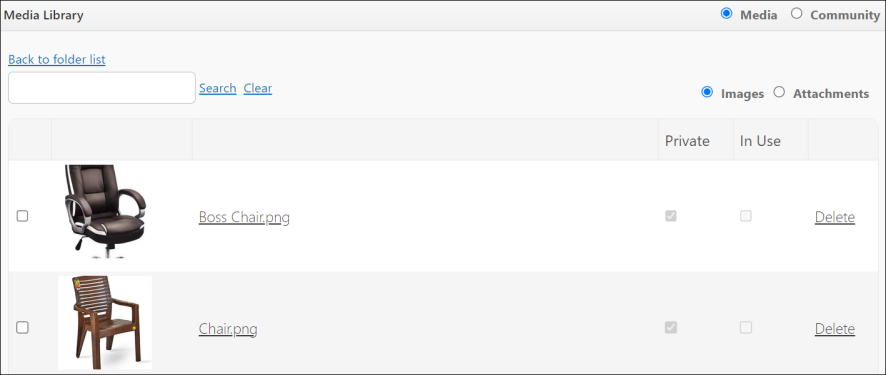
In this release, a new column named Private is added to the Media Library. Inside this column, a check box is added corresponding to each row. When a requester uploads a private document, this check box appears selected, otherwise it is cleared.
This enhancement is expected to enable administrators to quickly identify private documents that are uploaded on the Event Manager application. To view the changes made by this enhancement, you must log on to the application with admin privileges.
Refer to the following screenshot for clarity.
Upload Private Documents to Events
In this release, the ability to upload private documents on the event form is introduced. Customers can upload documents and securely share them with administrators so that other users cannot access them.
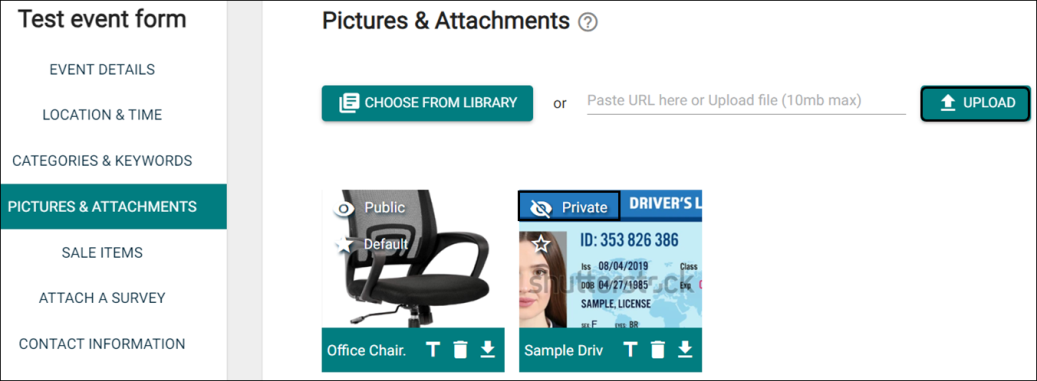
On the event form, in the Pictures & Attachments section when you upload a document an eye icon appears on the document preview. To make the document Private, click the eye icon. The document is marked as private and the status is updated.
Refer to the following image for greater clarity.
Important Points:
- When a document is uploaded, by default the status is Public.
-
Private documents are not visible on the Public Calendar or Media Library.
-
The status of a Default document cannot be changed to Private. Selecting the star on a document preview makes it a default document. In such a scenario, the status will automatically change from Private to Public.
- Documents in the Media Library cannot be marked as Private.
-
To make them private, you must download them, upload them on the event form, and change the status to private.
Day, Week and Month Calendar View
To view events and tasks using the calendar view:
-
In the left pane, select Events > Events List.
-
From the dropdown list, select the Calendar View option.
Calendar View

-
To view events within a specific time frame, click the day view, week view or month view icon respectively.
List View

Day View

Week View
Month View
-
The following fields are displayed when the day view, week view or list view icon is selected when reviewing events.
-
Start Time
-
End Time
-
Title
-
-
The following fields are displayed when day view, week view, or list view icon is selected when reviewing tasks.
-
Start Time
-
End Time
-
Title
-
-
To view specific event related details, hover your mouse pointer on an event when you are reviewing it in calendar view.
-
Event ID
-
Event Title
-
Event Start Time
-
Event End Time
-
Location
-
Organizer
-
-
To view specific task related details, hover your mouse pointer on a task when you are reviewing it in calendar view.
-
Task Title
-
Assignee
-
Due Date
-
Event Name
-
Event Title
-
Associated Locations
-
Bulk Cancelling Events - Add and record the cancellation reason
We’ve added the ability for admins with permissions to bulk cancel approved events by adding a reason for cancelling them.
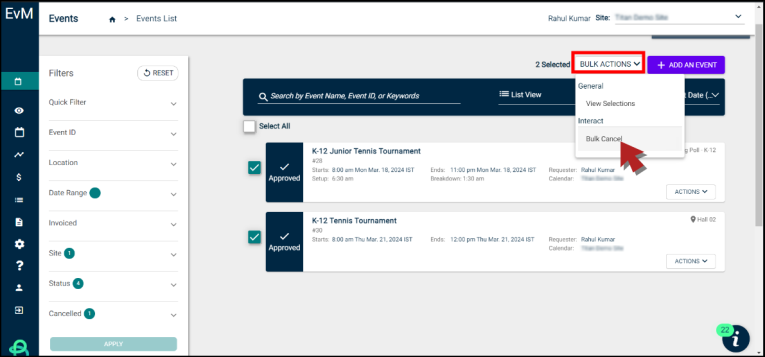
To do this, navigate to Events List or Pending Events from the left navigation panel and select the approved events that you want to cancel. Then, click on the BULK ACTIONS drop-down and select Bulk Cancel. *Note: You can cancel approved events only.
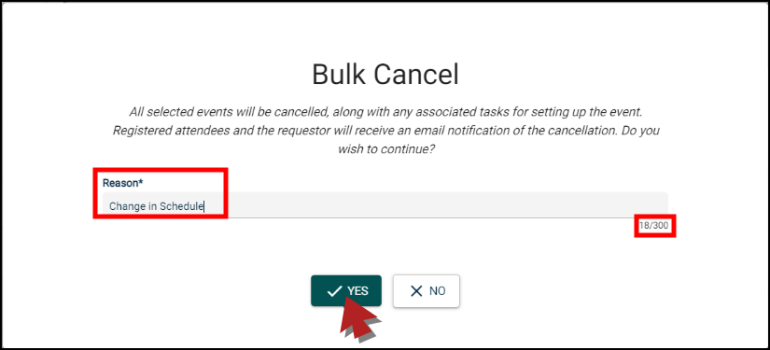
Next, add the reason for cancelling the events and then select the option to notify the requestors. You can add upto 300 characters for summarizing the cancellation reason. The character count will indicate the remaining characters as you write.
Click Yes to confirm the changes to cancel the required approved events successfully.
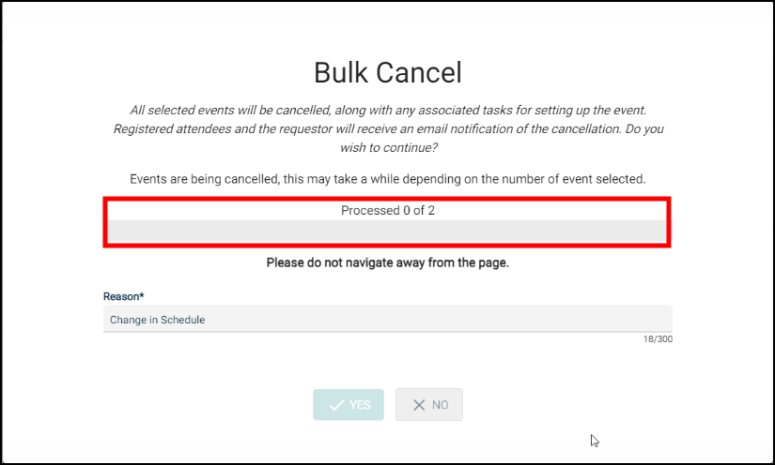
You'll see a progress bar indicating the completion of the executed action.
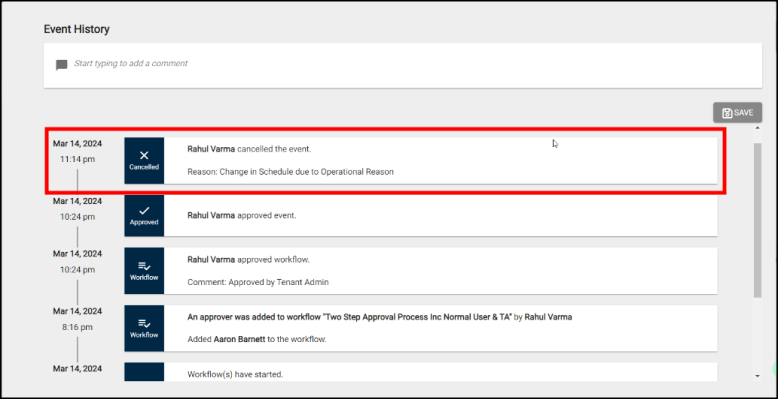
You'll find the updated cancellation reason in the Event History section along with the user details and the timestamp for when these approved events were cancelled in bulk.
Upon completion, the requestors will get an email notification containing the cancellation reason.
Change approver name and/or role on an event approval workflow
We've updated the ability for admins with permissions to change the Approver Name and/or Role as against to the existing one on an Event Approval workflow.
Here's how this works:
Navigate to the Events List or Pending Events and click on the required pending event card to open the Event Details. Scroll down to the Approval Workflow section and click on it to add, edit, or delete a user from an existing workflow.
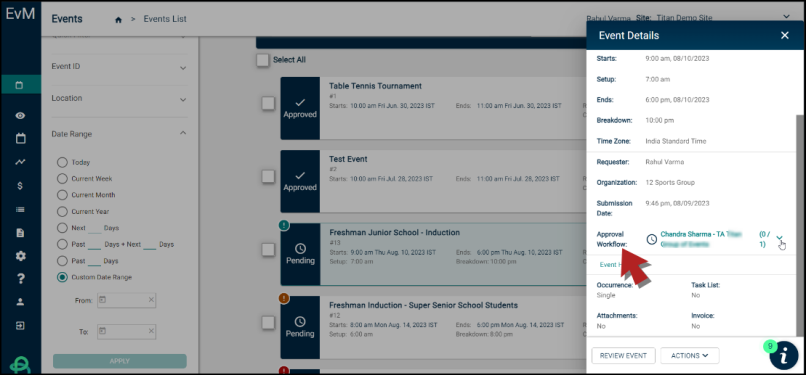
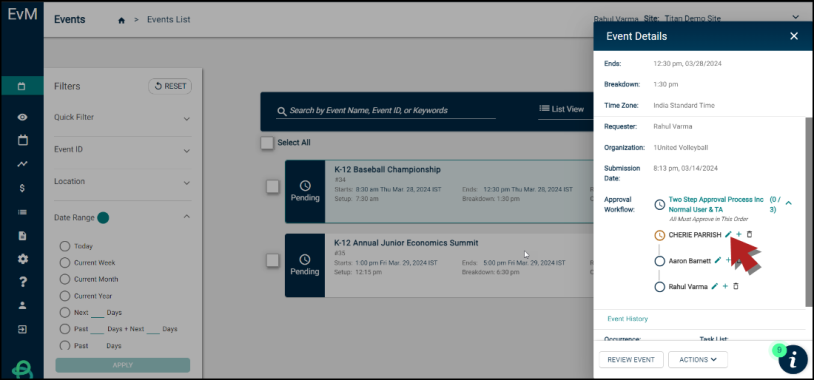
Click on the pencil icon next to the required user to edit the approver details.
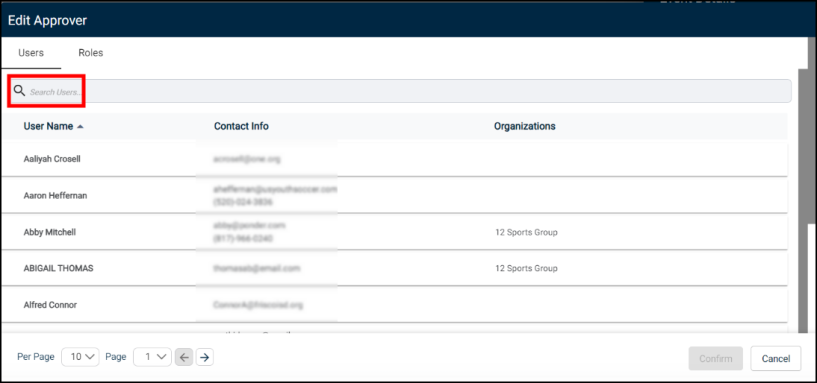
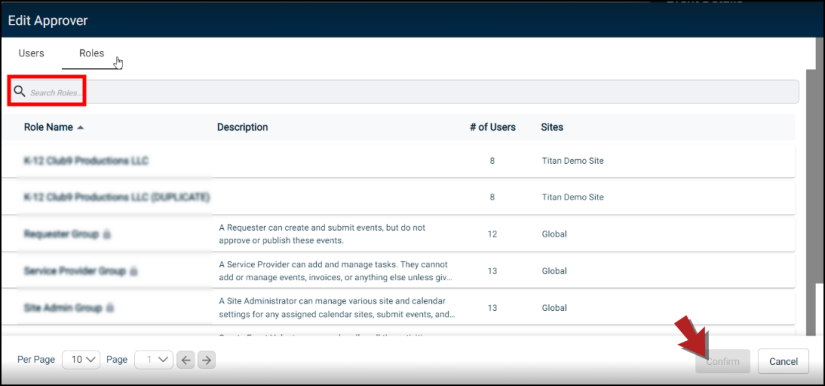
On the Edit Approver screen, go on to replace the existing approver with either a user or a role as required.
To add a user, you can find the required user by typing their name or by scrolling through the usernames.
Switch to the Roles tab to replace the user details with a Role. This way, any user who is a part of that role will be able to approve the event.
After editing approver details, click on the Confirm button to update these changes.
To add a new user to the approval workflow, click on the + symbol and follow the same instructions as mentioned for editing a user and/or role on the approval workflow.
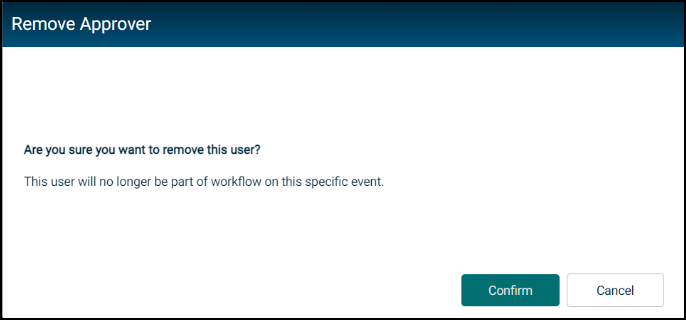
To remove an existing user or role from the Approval process, click on the delete icon next to the required user. A dialogue box will open prompting you to confirm the deletion of the current user/role from the workflow.
Here's a few things to take note of:
-
The delete user option will not be available if you've deleted all the users/roles from an existing workflow. Proxy users cannot approve the entire workflow.
-
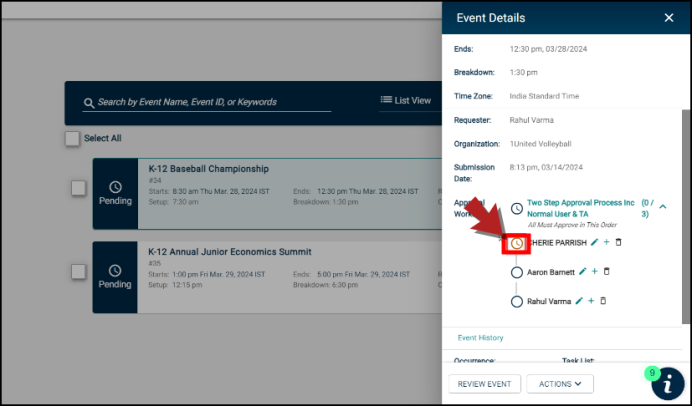
The clock icon next to a user's name indicates that the user is next in line to approve the event and an email has been sent to that user/role to review and approve the changes.
-
Anytime you add a user or a role, they will appear next in line in order to support an ordered workflow.
-
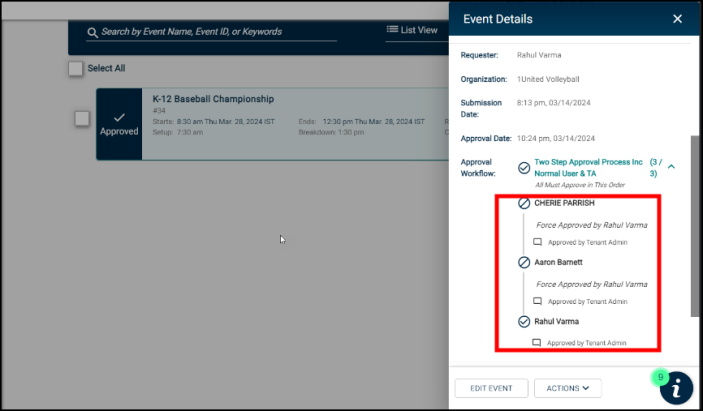
In case an event is force approved, the event status will change and you'll see the force approver's name and the comment with which the event was approved.
View change history on the event form when viewing versioned events
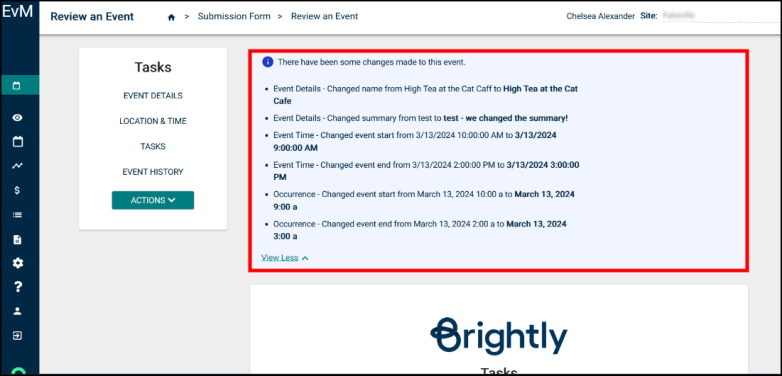
We've added the ability for admins with permissions to view the change history on the event form when viewing versioned events.
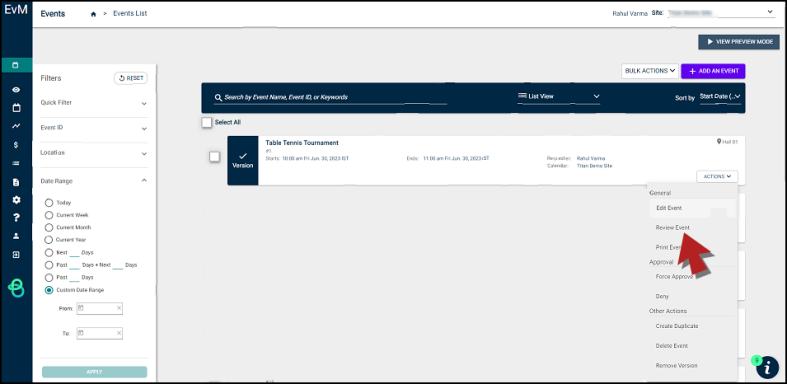
To do this, navigate to the Events List or Pending Events and select a pending event to view the version event details. Then, click on the Actions drop-down and select Review Event.
You'll be redirected to the event Submission Form where you can view the event details as shown in the image below:
Deprecated the old Users page
We've removed the old Users page from the Settings section. Now, you'll be redirected to the new Users and Roles page whenever you try accessing the old Users page.
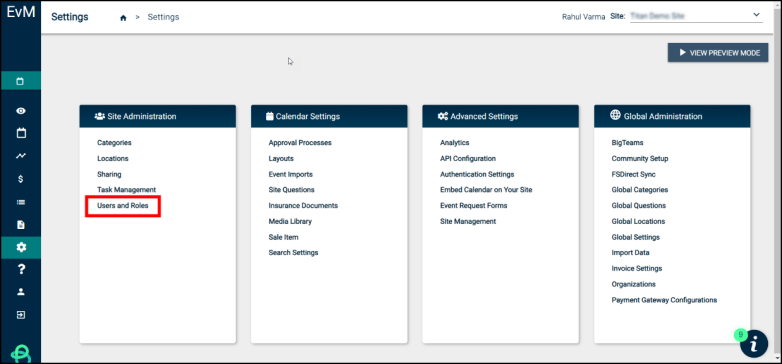
To access the updated Users and Roles page, go to Settings and navigate to Users and Roles under Site Administration.
Please note:
-
You'll no longer see the Users tab under Site Administration on the Settings page.
-
The suffix *New* has been removed from the Users and Roles tab.
-
If you've bookmarked the old Users page, you'll automatically be redirected to the newer Users & Roles page once you log in to the EvM platform using your credentials.
Bulk Update - Deactivate Users
We've added the ability for admins with permissions to use the Bulk Actions feature to deactivate multiple users at once. *Note: This functionality is available for admins and users with the access to edit the Users and Roles page.
To use the Bulk Actions feature, go to Settings and navigate to Users and Roles*New* under Site Administration.
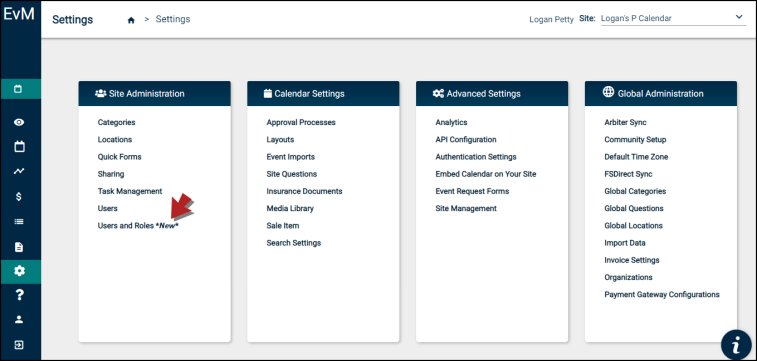
Check the boxes next to users' names to select the required users.
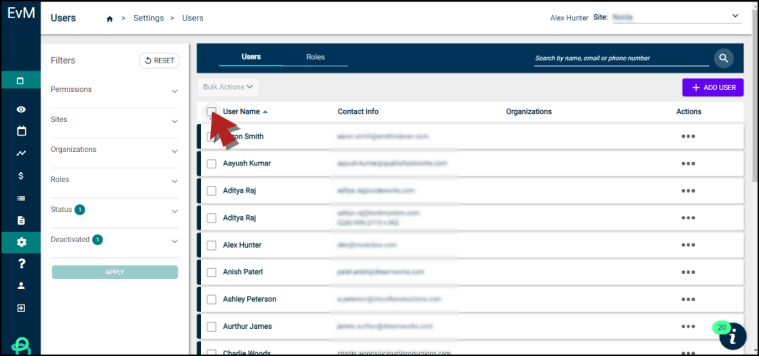
After selecting the required users to deactivate, click on the Bulk Actions drop-down and select Deactivate User.
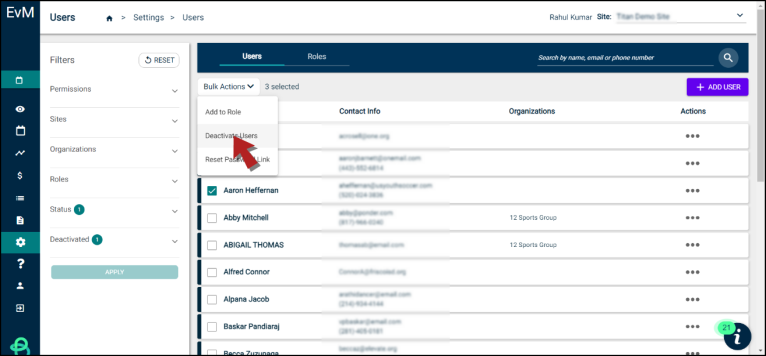
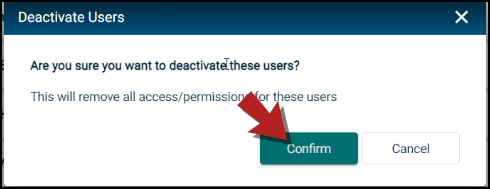
Click Confirm on the dialogue box on screen to proceed further.
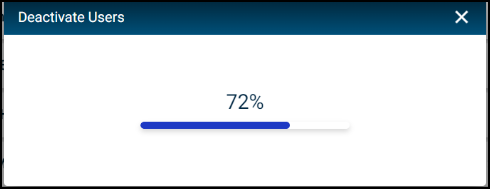
After confirming the action, you'll see a progress bar indicating the percentage completion of the executed action.
Upon completion, you'll be redirected to the Users and Roles page to complete the Bulk Action process for deactivating the selected users.
Please note:
-
The Bulk Actions drop-down will be click-able after you've selected at least one user to deactivate.
-
You'll see a count of selected users next to the Bulk Actions drop-down.

Bulk Update - Assign Roles
We've added the ability for admins with permissions to use the Bulk Actions feature to assign multiple roles to users selected in bulk. *Note: This functionality is available for admins and users with the access to edit the Users and Roles page.
To use the Bulk Actions feature, go to Settings and navigate to Users and Roles*New* under Site Administration.

Check the boxes next to users' names to select the required users.

After selecting the required users to assign roles to, click on the Bulk Actions drop-down and select Add to Role.
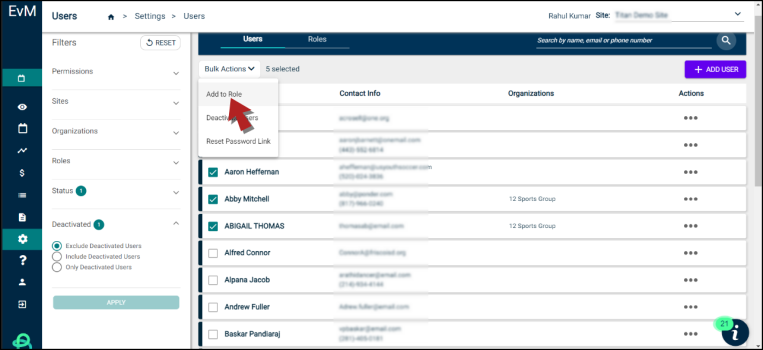
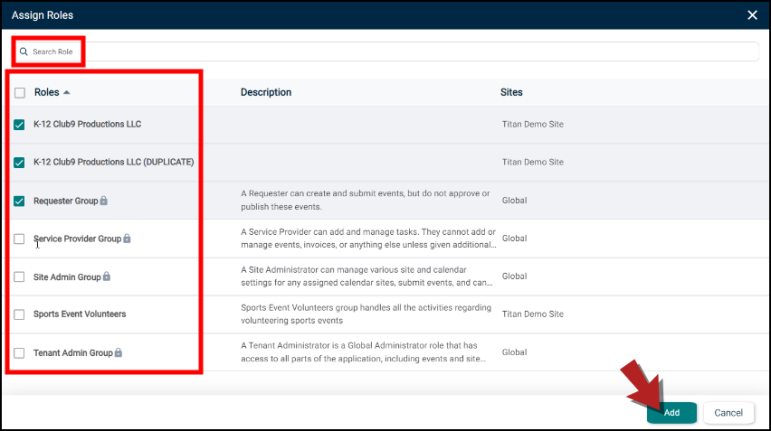
Once you've selected users to assigns roles to, you'll see a list of active roles to choose from or you can also search for the required role using the search box. Then, click Add to assign the selected roles to users.
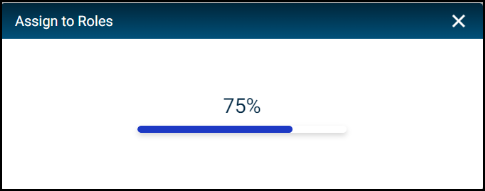
After confirming the action, you'll see a progress bar indicating the percentage completion of the executed action.
Once completed, you'll see a completion status on screen:

You'll automatically be redirected to the Users and Roles page to complete the Bulk Action process for assigning roles to the selected users.

Please note:
-
The Bulk Actions drop-down will be click-able after you've selected at least one user to assign a role to.
-
You'll see a count of selected users next to the Bulk Actions drop-down.
-
You can assign roles to active users only. Similarly, you can assign active roles to the selected users.
Updated Approval Processes page
We've updated the ability for tenant admins to search for existing approval processes using the improved search box and newly added filter options on the Approval Processes page.
To do this, go to Settings and navigate to Approval Processes under Calendar Settings. Use the search box to find the required approval process.
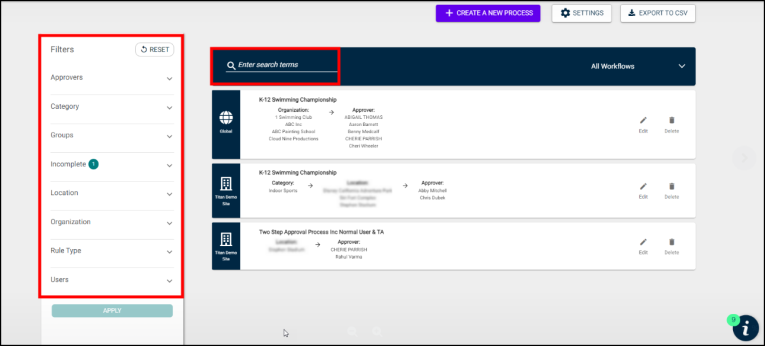
Here's a few things to take note of:
-
You can search for an approval process by using the text or special characters included in its title.
-
You'll see the Filters section on the left side. It enables you to specify your search by utilizing various filter options. Let's take a look at these filter options:
-
Approvers: Use this option to filter the Approval Process Rules by the assigned Approvers. *Note: You can either select a single approver or multiple approvers for an approval process.
-
Category: Use this option to filter the Approval Process Rules by the condition of Categories.
-
Groups:Use this option to filter the Approval Process Rules by the condition of Roles. *Note: The Roles refer to the users who've been assigned specific roles in the system.
-
Incomplete: Use this option to filter the Approval Process Rules by ones that need attention.
-
Location: Use this option to filter the Approval Process Rules by the condition of Location.
-
Organization: Use this option to filter the Approval Process Rules by the condition of Organizations.
-
Rule Type: Use this option to filter the Approval Process Rules by the type of condition selected.
-
Users: Use this option to filter the list of Approval Process Rules by the condition of User.
-
Bulk update - Send a reset password link for verified users
We've added the ability for admins with permissions to use the Bulk Actions feature to send the password reset links via email to all the verified users. *Note: This functionality is available for admins and users with the access to edit the Users and Roles page.
To use the Bulk Actions feature, go to Settings and navigate to Users and Roles *New* under Site Administration.
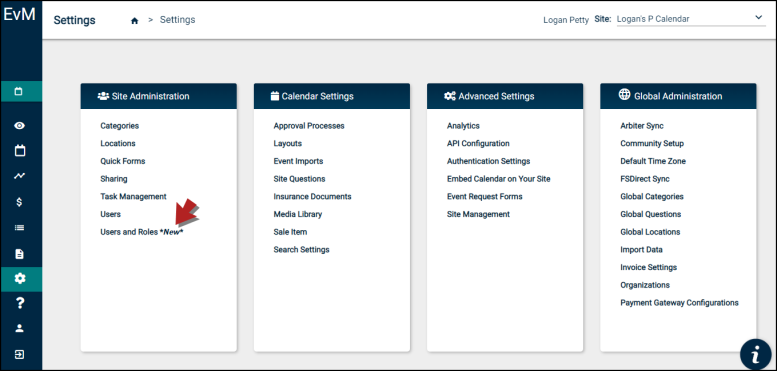
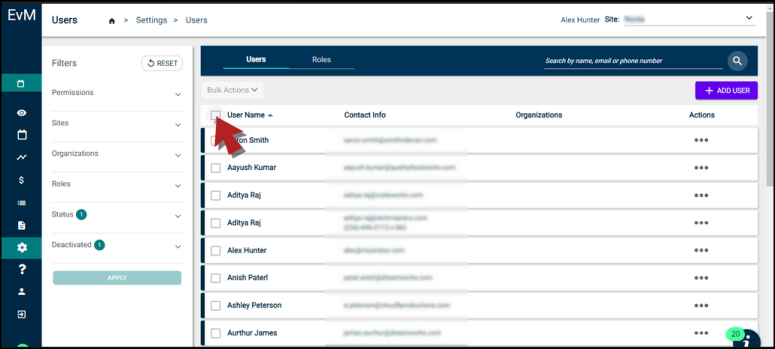
Check the boxes next to users' names to select the required users.
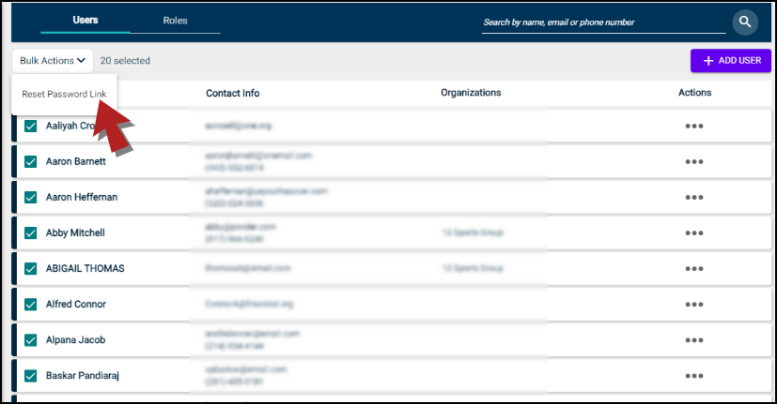
After selecting the required users to send reset password email to, click on the Bulk Actions drop-down and select Reset Password Link.
Click Confirm on the dialogue box on screen to proceed further.

After confirming the action, you'll see a progress bar indicating the percentage completion of the executed action.

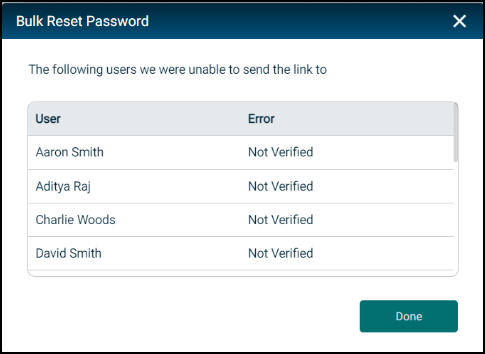
Upon completion, you'll see the users who did not receive the reset password email, along with the error details. Click Done to return to the Users and Roles page and complete the Bulk Action process for sending the reset password email to the selected users.
Please note:
-
The Bulk Actions drop-down will be click-able after you've selected at least one user to send the reset password email to.
-
You'll see a count of selected users next to the Bulk Actions drop-down.

Add cancellation reasons for approved events
We've added the ability for tenant admins and requestors or users with event admin permissions to add a reason for cancelling an event. This will allow you to efficiently manage your event volumes.
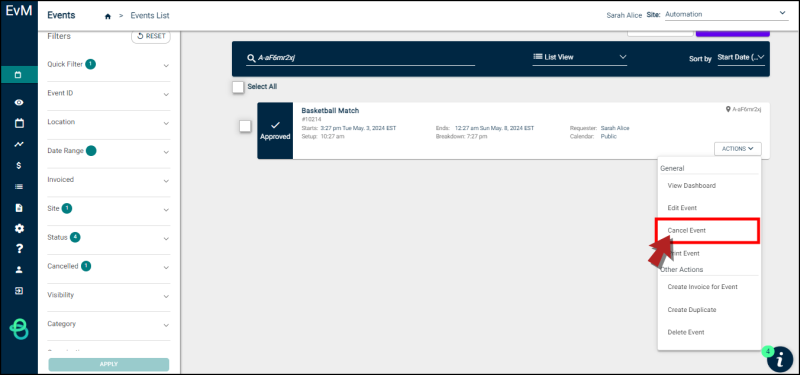
To add a reason for cancelling an event, click on Events List in the left navigation panel, and navigate to the approved event that you want to cancel. Then, click on the Actions drop-down menu and select Cancel Event from the options.
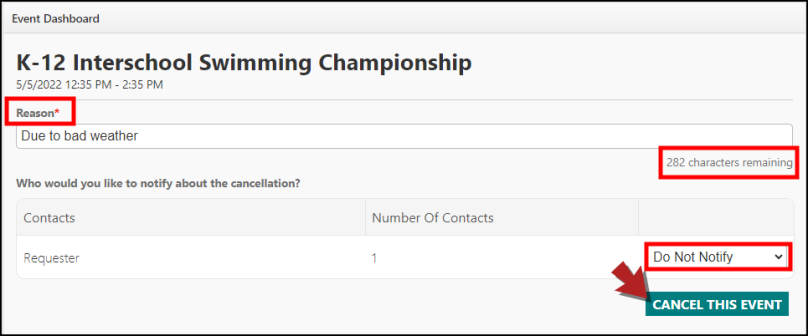
Go on to add a reason for cancelling the event. You'll have a maximum of 300 characters to summarize the reason for cancellation. The character count will indicate the remaining characters as you write.
After adding the cancellation reason, you can use the option to notify requestors. Once done, click on CANCEL THIS EVENT and confirm the changes to proceed.
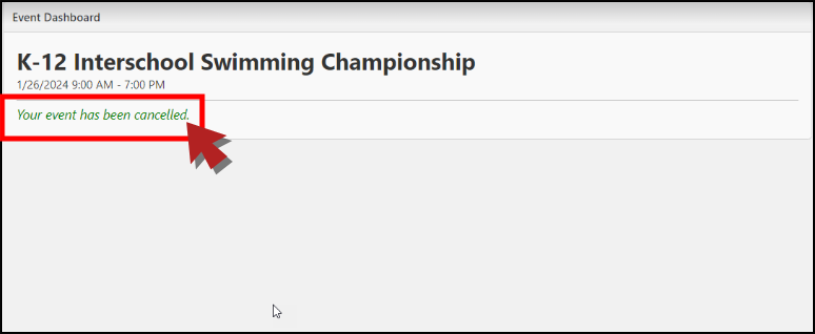
You'll see the confirmation message like this:
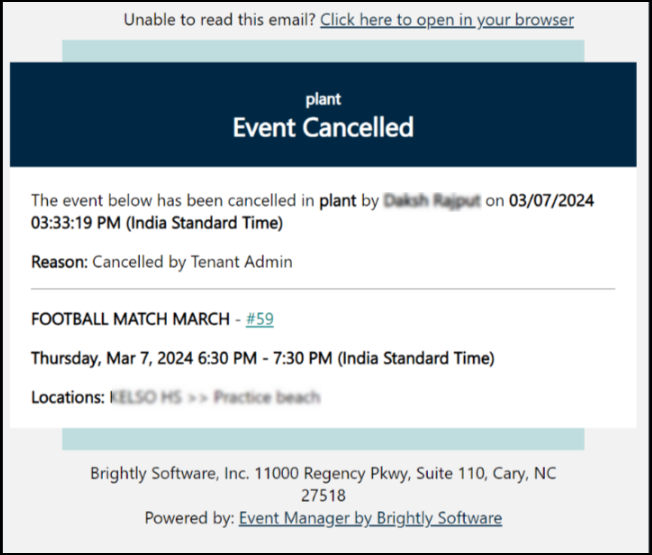
If you've subscribed to receive Event Cancellation Notifications, you'll get the following email message:

*Note: You can add the cancellation reason for ONE approved event at a time.
We've added the feature functionality for tenant admins to duplicate an existing role. This will enable you to fully migrate from legacy Users pages to the newly created Users and Roles section.
To do this, go to Settings and navigate to Users and Roles *New* under Site Administration. Then switch to the Roles tab, click on the horizontal ellipsis in the Actions column, and select Duplicate.
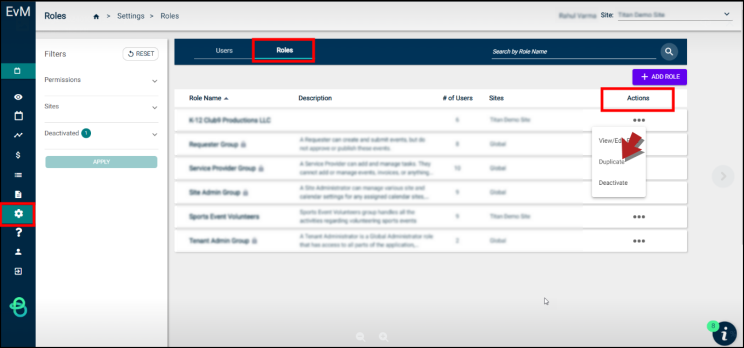
You'll see a dialogue box on screen prompting you to select one of the following options:
-
Permissions and Members: Select this option to copy both the permissions and members from an existing role.
-
Permissions only: Select this option to copy only the permissions from an existing role.
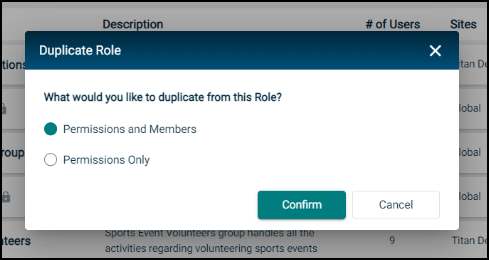
After selecting either of the above-mentioned options, you'll be directed to the Roles Edit page. Edit the role name, review the selected permissions and members or only permissions, and then proceed to save changes.
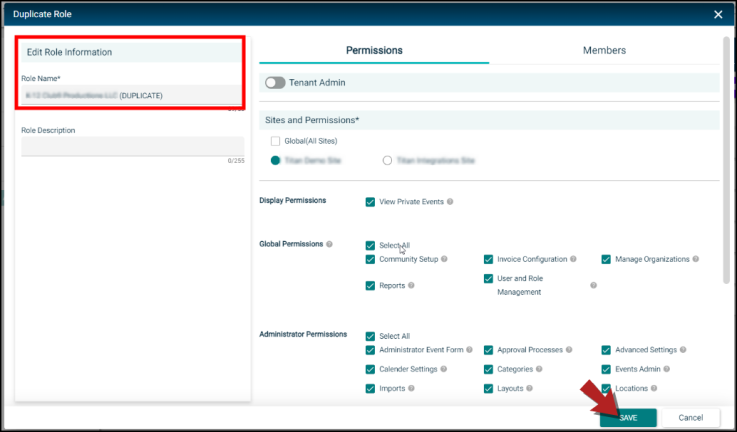
Here's a few things to remember while duplicating a role:
-
Each duplicated Role Name will carry the suffix (DUPLICATE).
-
The character limit for a duplicated Role Name is set to 50 characters irrespective of duplicating a new role from an existing one.
-
You can duplicate a role by meeting the default requirements to create a role, such as adding the role name, assigning a role, and selecting at least one permission.
*Note: The Duplicate feature works for creating a role that is not system generated. You can make a copy of non-default roles only.
